An image captures a lot of what you want your customer to know about a product, so be sure it shows the right things. Learning to think in greater detail about the visual representation of your offerings will help you verbalise them better for those with visual impairments, too. Here we present some of our very best tips for moments when you may feel uncertain about your product photography, or maybe you haven’t even started yet?

Some Thoughts Before You Begin
Plan the shoot. Decide which photo needs to be the main one, the one showing in a webshop, and what other images you will need to keep telling more of its story.
Let’s consider a bag from the perspective of a customer:
- You want the whole bag against a clean background, by which we mean the item shouldn’t compete with what is around it at this point.
- You want to see handles, bottom, closing mechanism(s), the inside overall, details of phone pockets etc.
- You definitely want a closeup of the material.
- And once you are done getting an idea of the bag itself, you want to compare it to a person, but not just any person. You want to know if the model is far taller or shorter than you are, so their height is a nice thing to learn.
- Then you may want to see it “in the wild”, too, or perhaps next to similar items of different colours.
- A video doesn’t hurt.
Now that we have walked through a quick list of things to consider, let’s return to “plan the shoot”.
There are photos of just the bag, and others for which a model is needed. Don’t make the model wait when you take item photos. Separate these two phases.
Take enough photos from each angle so you can pick the best one with least amount of editing needed. Keep applying the same logic to whatever it is that you are selling.
A Professional Photographer Opens Up
I was present once when an apartment was being photographed before sale. Curious as I was, I asked the guy about his process, because previously another photographer had blitzed through a different flat with barely any photos taken. While those looked wonderful, they had required quite a bit of editing.
It all fell into place as the answer was: “I use a series. The settings series is always the same, so I take five photos from each angle, then pick the best one and do as little editing as possible.”
It took him a bit longer to finish the job in the flat, but he saved a lot of time later. Since he used no artificial lighting with the exception of the bathroom, they felt completely natural once the ad went up. Such a clever professional!
With that said let’s start with our first example photo.
Tip 1: Use Props
Props help you place a product at a great angle which is bound to intrigue your potential customer.
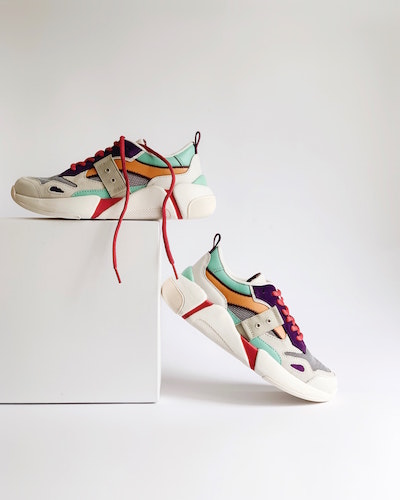
Irene Kredenets
The don’t have to cost a small farm either, but as an example in my newly opened retail shop selling craft supplies, I am working on that similar type of cardboard base except covered in white fabric. Metre price from Ikea around 4 € and cardboard for free from shipping materials. The cubes will go in the shop window, but come to think of it might as well be put to use in social-media imagery, too.
Be creative and unique to stand out. This way nobody can claim your photos as theirs either. Remember the watermarks on every.single.photo you post anywhere online!
Tip 2: Sometimes Help Is Needed
Not all items are easily understood without a bit of assistance.
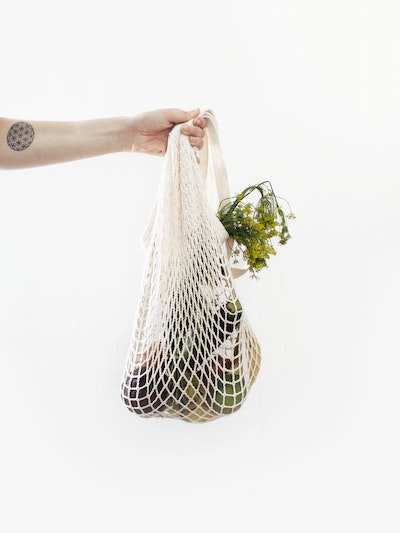
Sylvie Tittel
This example showing a crocheted grocery bag in action is quite concrete, but maybe your product is more complex still or just abstract.
Make efforts to help your customer understand and thereby increase the chance of them perceiving enough value to buy. What they don’t understand they won’t buy.
Tip 3: Show It In Action
Even though most know what a whisk does, few shops show them covered in chocolate batter.

Irene Kredenets
The less obvious and the more unexpected you can be in saturated markets, the higher your chance of success.
Tip 4: Appeal To A Lifestyle
Tech geeks will go all in if you show them enticing photography. They feel like they belong and not everyone’s prepared to join.

Christopher Gower
Tip 5: Show Scale
Some products are so weird when they first hit markets that it is best to show them in use. This way how they fit as well as how big they are will be easily understood from your photos.

Hammer Tusk
Tip 6: Use Photo To Upsell
Upselling may seem a bit blah to people, who dislike selling still, but it works. Try to get the customer to see how stylish they would look if they buy the jeans and boots, too.

Sarah Dorweiler
Tip 7: Show Behind The Scenes
If a behind-the-scenes image works, go for it! People love storytelling.

Ivan Bandura
Tip 8: Natural Habitat
In particular B2B sellers can be challenged. Maybe ask your customer, the café owner, to allow you to use a photo of your cake in situ?

Sabrina Mazzeo
Tip 9: Use Humour
Fun and games can be just what is needed to shake things up a bit.

Jiangxulei1990
Rounding Up
We hope these tips will help you look in new ways at product photography. If the technique itself is hard still, try the free courses on Coursera, which you can take for free if no certificate is needed.
Look at magazines, Pinterest, successful shops, etc. and think about why you are drawn to a certain style, whereas others don’t appeal to you at all. Definitely venture outside of your own industry for even more fresh ideas.
Tell us in the comments your thoughts and general feedback, we would love to hear!
If you found this blog post helpful, you might enjoy these, too:
Leave a Reply
You must be logged in to post a comment.